Set up WARP Connector
Feature availability
| WARP modes | Zero Trust plans |
|---|---|
|
All plans |
| System | Availability |
|---|---|
| Windows | ❌ |
| macOS | ❌ |
| Linux | ✅ |
| iOS | ❌ |
| Android | ❌ |
| ChromeOS | ❌ |
Cloudflare WARP Connector is a piece of software1 that enables site-to-site, bidirectional, and mesh networking connectivity without requiring changes to underlying network routing infrastructure. WARP Connector establishes a secure Layer 3 connection between a private network and Cloudflare, allowing you to:
- Connect two or more private networks to each other.
- Connect IoT devices that cannot run external software, such as printers and IP phones.
- Filter and log server-initiated traffic, such as VoIP and SIP traffic.
- Apply Zero Trust security policies based on the source IP of the request.
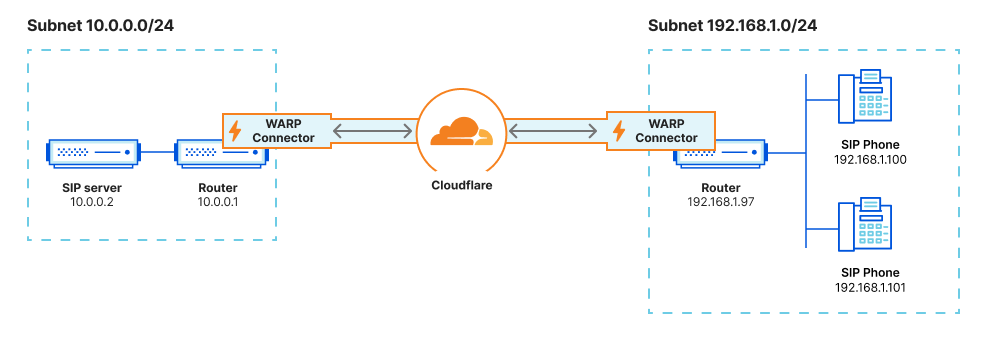
As shown in the diagram, WARP Connector acts as a router for a subnet within the private network to on-ramp and off-ramp traffic through Cloudflare. All devices on the subnet can access any services connected to Cloudflare, and all devices connected to Cloudflare can access any services on the subnet. Each subnet runs a WARP Connector on a designated Linux machine (typically the default gateway router), but other devices on the network do not need to install software.
This guide will cover how to connect two independent subnets, for example 10.0.0.0/24 and 192.168.1.0/24.
Prerequisites
- A Linux host2 on each subnet
- Verify that your firewall allows inbound/outbound traffic over the WARP IP addresses, ports, and domains.
1. Create a service token
Create a new service token and copy its Client ID and Client Secret. WARP Connector will use this service token to authenticate with your Zero Trust organization.
2. Add a device enrollment rule
Next, create a device enrollment rule that allows the WARP Connector to authenticate:
-
In Zero Trust, go to Settings > WARP Client.
-
In the Device enrollment card, select Manage.
-
Select Add a rule.
-
Name the rule.
-
For Rule action, select Service Auth.
-
Configure the following fields:
Selector Value Service Token <SERVICE-TOKEN-NAME> -
Select Save.
3. Enable CGNAT routing
All WARP Connector and WARP client devices in your Zero Trust organization have the same local IP address by default. To route traffic between various WARP devices, you must allow Cloudflare to assign a unique CGNAT IP to each device.
-
In Zero Trust, go to Settings > Network.
-
Enable Proxy.
-
Enable Warp to Warp. This allows Cloudflare to route traffic to the CGNAT IP space.
-
Next, go to Settings > WARP Client.
-
Enable Override local interface IP.
-
Check your Split Tunnel configuration and ensure that the CGNAT IP space (
100.96.0.0/12) routes through WARP.For example, if you are using Exclude mode, delete
100.64.0.0/10from the list and re-add100.64.0.0/11and100.112.0.0/12.
4. Install a WARP Connector
Each subnet must run its own WARP Connector on a Linux host. Installing on your router is the simplest setup, but if you do not have access to the router, you may choose any other machine on the subnet.
In this example, we will create a WARP Connector for subnet 10.0.0.0/24 and install it on 10.0.0.1. We will then create a second WARP Connector for subnet 192.168.1.0/24 and install it on 192.168.1.97.
-
In Zero Trust, go to Network > Tunnels.
-
Select Create a tunnel.
-
For the connector type, select WARP. Select Next.
-
A window will appear with a list of prerequisites. Select Confirm to continue.
-
Give the tunnel any name (for example,
Subnet-10.0.0.0/24) and select Save tunnel. -
Select the operating system of your host machine.
-
Copy-paste the command into a terminal window and run the command. WARP Connector software is now installed, but not yet connected to Cloudflare.
-
To authenticate the WARP Connector to your Zero Trust organization:
- Create an
mdm.xmlfile in/var/lib/cloudflare-warpusing any text editor:
- Add the following text to the file. Make sure to fill in your team name, the Client ID and Client Secret of your service token, and the WARP Connector token value (shown in the dashboard). As soon as you save this file, WARP will automatically register with the provided credentials.
- Verify the registration:
Troubleshoot missing registration
If the registration did not go through, try the following troubleshooting strategies:- Ensure that
mdm.xmlis formatted correctly and stored in/var/lib/cloudflare-warp. - Ensure that you have a device enrollment rule with the Service Auth action (not Allow).
- Restart the WARP systemd service:
- Clear an old registration and trigger WARP to re-register:
- Review your WARP daemon logs for information about why the registration is failing.
- Verify that WARP is connected to Cloudflare:
Troubleshoot connection
If WARP is disconnected, try the following troubleshooting strategies:
-
Run
warp-cli connect. -
If your private network uses a firewall to restrict Internet traffic, ensure that it allows the WARP ports and IPs.
-
Review your WARP daemon logs for information about why the connection is failing.
- Create an
- Select Next.
- In CIDR, enter the private IPv4 address range that you wish to route through this WARP Connector (for example,
10.0.0.0/24). WARP Connector does not currently support IPv6 routes.
-
Select Save Tunnel.
-
In your Split Tunnel configuration, ensure that your CIDR is routing through the WARP tunnel. For instructions on how to do this, refer to Route private network IPs through WARP.
The
10.0.0.0/24WARP Connector is now connected to Cloudflare. -
Repeat these steps to install an additional WARP Connector on subnet
192.168.1.0/24. You can reuse the service token, but you will need to create a new tunnel and MDM file.
5. Configure the host
Run the following commands on the machine where you installed WARP Connector. You will need to configure the host machine on each subnet.
-
Enable IP forwarding:
Save configuration to persist after reboot
-
WARP’s virtual interface has a maximum transmission unit (MTU) of 1280 bytes, whereas the standard Ethernet MTU is 1500 bytes. To avoid dropping packets that exceed 1280 bytes, clamp the maximum segment size (MSS) of the host machine so that incoming payloads are less than the MTU of WARP:
Save configuration to persist after reboot
- Create a bash script that writes the
iptablerules to a file:
- Run the script:
- Create a systemd service to restore the rules at startup:
- Create a bash script that writes the
6. Route traffic through WARP Connector
Depending on where you installed the WARP Connector, you may need to configure other devices on the subnet to route traffic through WARP Connector.
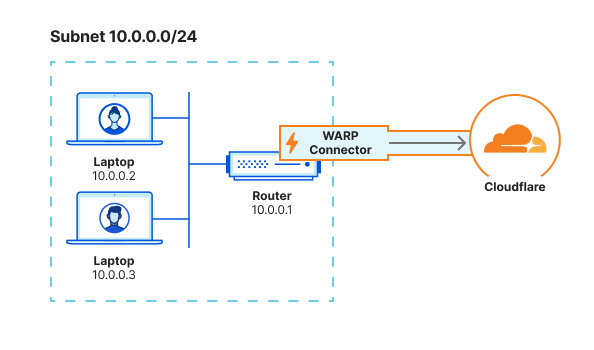
Option 1: Default gateway
If you installed WARP Connector on your router, no additional configuration is necessary. All traffic will use the router as the default gateway.
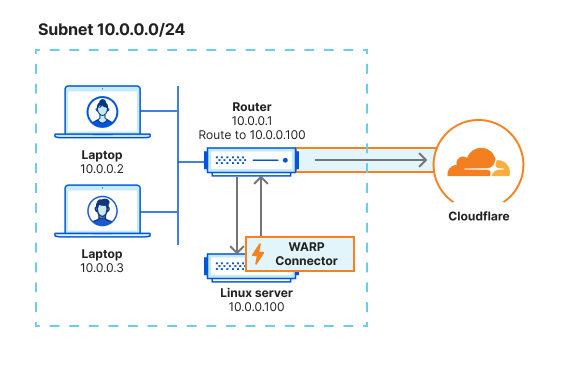
Option 2: Alternate gateway
If you have access to the router but installed WARP Connector on another machine, you can configure the router to forward traffic to the WARP Connector. This typically involves adding a static route for the destination IPs that you want to connect to through Cloudflare. Refer to your router’s documentation for specific instructions on how to add an IP route.
For example, if you are on subnet 10.0.0.0/24 and want to reach applications behind subnet 192.168.1.0/24, add a rule that routes 192.168.1.0/24 to the WARP Connector IP (10.0.0.100 in the diagram below). When a device sends a request to 192.168.1.0/24, the router will first redirect the traffic to the WARP Connector machine. WARP Connector encrypts the traffic, changes its destination IP to the WARP ingress IP, and sends it back to the router. The router will now forward this encrypted traffic to Cloudflare.
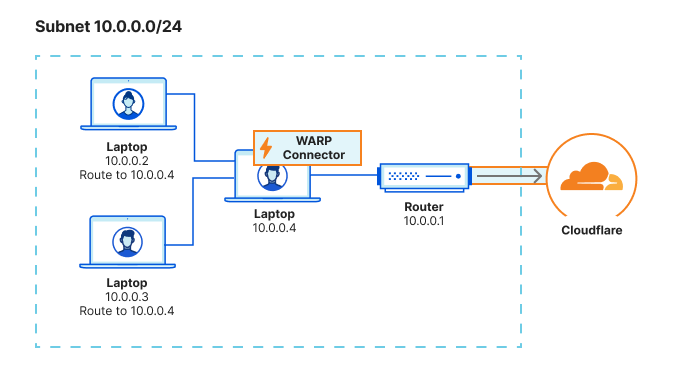
Option 3: Intermediate gateway
If you do not have access to the router, you will need to configure each device on the subnet to egress through the WARP Connector machine instead of the default gateway.
Route all traffic
You can configure all traffic on a device to egress through WARP Connector with its local source IP. All traffic will be filtered by your Gateway network policies.
Ensure that the metric value is lower than other default gateways. To verify that WARP Connector is now the preferred default gateway, run ip route get <DESTINATION-IP>.
Route specific IPs
You can configure only certain routes to egress through WARP Connector. For example, you may only want to filter traffic destined to internal applications and devices, but allow public Internet traffic to bypass Cloudflare.
Verify routes
To validate subnet routing, check your routing table and ensure that traffic is routing through the CloudflareWARP virtual interface.
7. Test the WARP Connector
You can now test the connection between the two subnets. For example, on the 10.0.0.2 device run ping 192.168.1.100.
-
WARP Connector is an extension of the WARP client.
-
- System requirements
- Package dependencies:
curlgpgiptablesiptables-persistentlsb-coresudo